

As a Counsellor or Counsellor Lead in myBlueprint, you have access to a number of powerful options to configure the courses at your school. This controls what students can see and add into their High School Plan in myBlueprint for future school years, whether for graduation planning purposes, or if you are using the Course Selection features of myBlueprint.
How do I add a new course?
- Are you in a district that does course selection with myBlueprint, or receives course imports from a Student Information System (SIS)?
- If so, the only way to add a new course is often through your SIS. Your course must be added into next year's course scheduling in your SIS, after which it will come over on the next import.
- Depending on the configuration for your school, you may have the option to import courses directly from a Counsellor Lead account. In some cases, you may also be able to add a course manually (see #2 below).
- If the 'Import Courses' link on your Dashboard is locked, this means that courses are imported centrally by your board - once any new courses have been added in your SIS, please contact your board IT to request a new import, and/or find out when the next scheduled import will be completed.
- Are you in a school or district that does not receive courses from an SIS, or does not use myBlueprint for course selection?
- You can add courses directly within myBlueprint by completing the following steps from your Counsellor or Counsellor Lead account:
- Click Courses
- Click the round grey icon to the right of the word Courses, see screenshot below
- Click Add Course
- Complete the course information form with the required details (credit value, grade level, description, etc.), and click Save Changes
- You can add courses directly within myBlueprint by completing the following steps from your Counsellor or Counsellor Lead account:

How do I enable and disable courses?
- Disabling a course will mean your students will not see it as an option to add to their High School plans, however you will still be able to see it in your Disabled Courses tab. You can re-enable it again in the future without requiring a new course import (e.g.for courses offered only in alternating years)
- Disable courses
- From your Enabled Courses tab, find your course
- Click the 3 grey dots to the right of the course
- Click Disable Course
- Enable courses
- From your Disabled Courses tab, find your course
- Click the 3 grey dots to the right of the course
- Click Enable Course
- Disable courses
- Pro Tip: if you want to disable and enable courses en masse, check off the boxes to the left of the courses you want to update, then click the blue Group Actions button.'
How can I customize the course description, prerequisites, or other course attributes?
From within your Counsellor, or Counsellor Lead account, simply:
- Click Courses in the left-hand navigation menu
- Locate the course you wish to edit (you can use the search bar or filters to find it)
- Click the Course Code
- Update any fields that you want to change, and click Save Changes
If you have multiple courses and you wish to update the discipline or credit value for all of them at the same time, you can also check them off within the Courses section, then click Group Actions > Update Courses.
Can I download a file with all of my school's courses?
Yes! To do so, simply click the 'down arrow' button near the top right of the Courses section.
This will generate an Excel file with all of your school's enabled courses - great if you want to distribute the course information in myBlueprint to your department heads so they can review descriptions, etc.
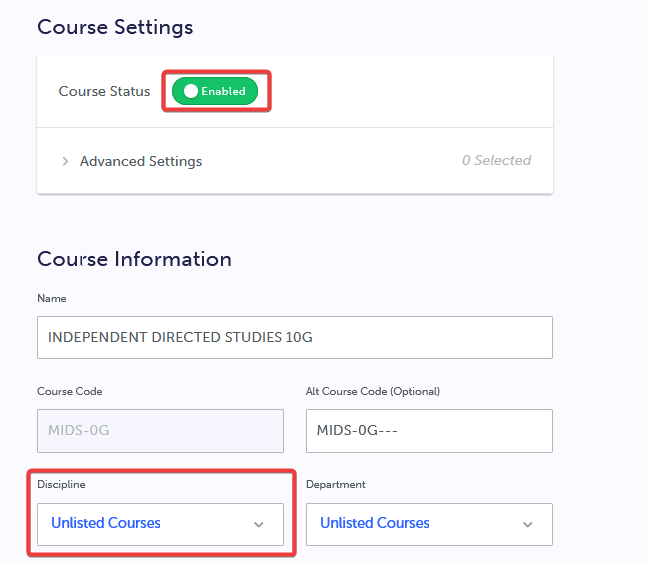
Why are some courses in red and flagged as 'Need Review'?
This simply means that the courses do not have a specific discipline assigned. When courses are imported from your SIS, they may have a discipline provided in the data, or pre-populated based on myBlueprint's defaults for your province.
Any course codes not mapped to a discipline are flagged in red as 'Need Review', and grouped under 'Unlisted Courses' in the Discipline filter.
To address this and remove the red warning bubble:
- Open the Courses page within a Counsellor account
- Click the Need Review button, or select 'Unlisted Courses' in the Discipline filter
- The listed courses can be updated either individually by clicking the course code, or as a group by checking off multiple courses along the left-hand side
- To update an individual course, after clicking the course code, you can either disable the course by toggling Enabled to Disabled (if it's not a course you want to have visible for students), or update the Discipline from Unlisted Courses to your preferred course discipline
- To update a group of courses after checking them off, you can click Group Actions, then either Disable Selected Courses, or update the course discipline
Completing these steps is not mandatory, however, it is recommended to ensure that students are able to find courses more easily. Unlisted Courses are still visible within that 'folder' for students to add in their high school plan, but in some cases they may not be tracked correctly towards graduation requirements.
How do I set up course packages?
For courses that are commonly taken together by students in the same year (e.g. Grade 10 Civics and Careers in Ontario), you can set them up as a packaged course using the steps below. This will allow students to select 2 or more courses with just one click.
- From within your Counsellor or Counsellor Lead account:
- Click Courses
- Click the round + icon near the top right of your screen (see screenshot above)
- Click Add Package
- Some considerations when creating packages:
- All packages must have at least 2 courses
- Once the package is created, the two courses that make up the package should be disabled if you don't want students to have the option of selecting those individual courses
- Packages set up in myBlueprint typically do not need to be set up in your SIS as well.
- In other words, if the package has a course code of 'CIVCAR' in myBlueprint, but contains the courses GLC2O and CHV2O, selections for the package will be exported to your student information system as those two separate course codes
- This is a customizable setting at the district level, so if you are encountering issues or have questions about the export of packages, contact myBlueprint Support
Why am I receiving a warning when trying to put courses in a custom discipline?
- As a general rule, we recommend keeping courses which satisfy compulsory graduation requirements in the discipline that corresponds with the graduation requirement name in your province (for example English Language Arts, or Fine Arts).
- You can add departments within disciplines to reflect sub-categories of courses, for example Music or Visual Arts.
- Elective courses that do not satisfy a specific credit requirement can be placed in a custom discipline of your choice without causing issues.